Showing posts with label tutorial. Show all posts

Wednesday, December 18, 2013

Make it Yourself! Vintage Girls Nightgowns

Crunchy Girl in her favorite hand made nightie. 


Topstitching around your lace or ruffled
trim gives it a nice clean edge. 
How many people do you know that make their own clothing? Would you like to? I will admit, I don't make all our own clothing, and what I do make is borne more of necessity than want, though once I started, I wanted to then make ALL the THINGS. One thing that every homesteader should know is how to mend and how to make their own clothing. It's easier than you think, and more rewarding than you expect. Especially when you score a bolt of fabric for like massive discount and can create something for every one of your kids for $10 total.

150 years ago, it was almost unheard of for people to not make their own clothing. Even when you "boughten" clothing, it was still handmade, as sewing machines weren't really around, though it wouldn't be long. The idea that someone would take 10000 yards of fabric and turn it into 1000 pairs of pants didn't exist.

I take every advantage I can use. I use a heavy duty basic sewing machine, a serger for seams and hems and edgings and then I even break out the embroidery machine every now and again to have some fun! While being a homesteader these days is all about getting back to basics, I see no reason not to use tools that can help make that journey more achievable.

Besides, who doesn't love nightgowns? I think all little girls do, and I know I prefer them. I hate wearing PJ's. They get bunched up around my knees at night, and then I wake up a tangled mess. So what's better than a frilly vintage nightgown? Why, one that's easy to make to boot! This one? Super easy, seriously you can make these in an hour or less. I was able to make four for my daughter in less than a half day.

There are two types of fabric I would use for this. Quilting cotton, or flannel. I use quilting cotton for a lightweight summer nightie, and then flannel in the winter, for a warm, fuzzy cuddly nightie. This nightgown only has four pieces, the front, the back and 2 sleeves. Now, I'm going to link the pattern here that you can buy for about $5 if you buy somewhere like Joann Fabrics or Walmart. But don't get overwhelmed! Patterns are so much easier than winging it! I promise you, this is a great project to start out with if you're a beginning sewer. Nothing fancy, just seams, and elastic. That's it. You can even forgo the lace trim on the bottom and cuffs and just turn up and hem to make it even easier.

A set of 6 nightgowns that went out for
the shop recently. Aren't they lovely!
Ok, so here's the link to the pattern. Just remember the number at the top right corner, that's how you'll find it in the store. The actual pattern calls for elastic in the waist area. I don't use that. I just omit that step altogether.

So just cut out your newspaper pieces and if you want, transfer them to poster board. That's what I use for patterns like this. I have all the sizes and use them over and over for the shop, so I like the poster board. You could also use card stock if you have that on hand and just tape them together.

After that, you simply cut out your fabric (after you've washed and dried it for shrinkage!) and then follow the directions!

Wednesday, December 11, 2013

How to turn Jeans into a skirt!

You know what I hate? Jeans that don't fit. Can anyone find them that do? Who are the jeans made for? I look for jeans made for "curvy" people, as I've got an arse that's completely not in proportion to the rest of me, and the waist gaps. I find some that fit in the hips and rear only to find that when I bend over, I'm giving off quite the show. You get them to fit in the waist and hips and find out that the thighs are as constricting as a boa.....Right. Jeans that fit. Oxymoron.

You know what I love? Skirts. Especially in the winter, and especially denim. Denim skirts allow me to be rough and tough around the house, but still have the benefit of a skirt. I bend over and show nothing. No strange breezes on my nether regions. Throw on a pair of cable knit tights and you'll be much warmer than when wearing pants, and with the weather we're having as of late, that's a blessing.

Now, know what else I don't like? Well, number one that it's hard to find denim skirts. You can check your local thrift shops, but if they are like mine, there was one skirt, and it was actually 2 sizes too big, so I was able to take it in, but sheesh! What's a girl need to do to find a decent skirt? Oh, what's that you say? Hit the jeans rack? Why yes! I think I will.

You can find jeans for like $3 a pair or less at most thrift shops. I prefer ones that have a bit of stretch in the denim because Im always crawling around or bending over doing things here at the homestead. I went to my closet first though because I had 2 pairs that I knew fit me, but the fits were all wrong, and so I turned one of them into a skirt this morning. Now, you'll need 2 pairs of jeans to make one skirt. Or, you can use fabric in the "holes" that you'll need to fill up if you want to recycle some fabric and the jeans at the same time. I prefer all denim because I need the warmth factor, but I will probably make some with quilting fabric for in the summer.

So, onto the tute! Now, you'll need some basic sewing skills, like how to sew a straight line, and a zig zag stitch (unless you have a serger). You'll need pins, thread, and scissors. Seriously it's that easy. I didn't even need to change out needles. I just used a simple size 80 needle.

So now you want to open up the inseams. All the way. Just take a seam ripper if you have one and open them up being careful not to rip the denim. You know, like I did.

Jeans after the inseam has been ripped. 


Front side of the old  jeans.
Opening up the front crotch. 
The next thing you'll need to do is to open up the crotch a bit and lay it flat. This is better explained by the photo below. Just rip the seams until the jeans will lay flat in the crotch. Then pin it down. You'll be sewing this down later.
Backside of the old jeans.


Then you'll need to get your fabric to fill this hole that's made by the legs being opened up. I chose to cut up another pair of jeans I wasn't using (guess what! They didn't fit right. Shocking). So I just cut off the legs, you know, just like how we did when we were in the 80's and wore our jean cutoff's except this time, you're going to discard the cutoff jeans shorts and use the legs. So open the legs up. You don't need to rip the seam, you can simply cut them open.


Denim fabric is underneath the old jeans. 
Lay out your opened leg under the hole of the denim soon to be skirt. Then just pin it up. Simply walk over to your machine now and stitch the fabric together. Then turn the skirt over and do the same for the back. You'll need to open the crotch a lot more in the back to get it to lay flat.


Pin up along the seams where you're going to sew. 


Turn it inside out and trim excess fabric. 


Now, just sew up the old seams tacking the jeans and the jean fabric (the leg you used from the other jeans or the fabric you're using) together. Turn it inside out and trim the seams. You can serge or zig zag the seams here together if you like.


Trim your hem to be equal all the way around. 


Once you're done with this, you now have a

skirt. Albeit one that is in dire need of hemming. I suggest trying it on and seeing about how much you want to take off. I like long skirts, so I just trimmed the fabric to be all even, then took off an inch.
Serge or zig zag your hem so that you can simply fold up and tack down. 


Hop on over to your serger, or sewing machine (with the stitch set to zig zag) and stitch your hem up. This will allow you to simply fold over your hem once, which is easier and creates less bulk, and is easier on your machine to stitch as well. I put a double stitch on the hem, which can be achieved by either changing the needle position and going around twice or by using a double needle and 2 spools of thread. I was too lazy to put in the double needle though, so I just went around twice.

Fold over and pin up your hem. 


Tack down with a single running stitch. 


I've added a double running stitch here for extra durability cause Im hard on things. :) 

Now! You have a skirt! And the best part? This type of denim skirt doesn't need slits in the sides or back. I've been wearing it all morning and have been cleaning and what not, and I've had enough room to move around without any issue!

You can see the finished product here, ignore my giant sweater, it's like 63° in this house. I love how flouncy it is!


Ignore the paint drops on the bottom of my mirror. I'm a sloppy painter.
See how cool this looks! I love that it doesn't need slits! 


Saturday, April 6, 2013

Weekend Projects: Seed Tape


As I browse the few catalogues I buy from each Spring, I am always looking to see what seeds come in a tape and can I use them. Lets face it. I love to garden. I love to do stuff from scratch. But I've got four kids and sometimes (read most) I'm lazy. I like the easy way out. I like to have a shortcut.


I always go back to buying the seeds by the ounce, because it's cheaper and we all know, we like our gardens to be as cheap as possible. I mean, if a packet of carrots cost me $2 and has 1500 seeds, thats less than $.0001 per carrot.  You can't beat that with a stick.  So then I had the bright idea, why not make my own seed tape?

Carrot seeds, radishes, lettuces. They are so tiny, and even those seed dispensers can be a pain to use when the seeds you're using are the same color or close to the same color as the dirt. And I hate thinning. It makes me sad to uproot little veggies that haven't had time to grow. I feel like I'm killing something. Plus, thinning takes work, and it's wasteful.

So I sat down and consulted the ultimate authority. Google. I found 100's of sites telling me how to make seed tape. Some said newspaper. Some paper towels. Some said elmers glue, some said a homemade paste of either cornstarch or flour and water. Well, I didn't have paper towels we got rid of those years ago. I don't get a newspaper to the house either. But I did have toilet tissue, and it's thinner than either newspaper or paper towels meaning it would break down faster allowing the germinated seed to grow better.

So I sat down with a roll of TP, some scissors a glue stick and my packet of 1500 Scarlet Nantes Carrot seeds. I tried the cornstarch and water/ flour and water paste. Let me tell you, if you have a glue stick, go with it. The cornstarch method was great if you made it thick (1:1), but it dried very very quick, and very thick. The thinner it was, the more mess it made. Lets face it, with four kids, I just don't need more mess, I have enough. So after wiping down my entire dining room table, I scoured the house and found a non-toxic glue stick. But the glue stick was too thick and was ripping the paper. For the love of Pete I just wanted some seed tape. So I consulted the second best authority. My best friend. I hope on the net and shoot her a message. She responds. "Use a toothpick to get some glue, and pick up the seed and then smoosh it on the toilet paper". GENIUS.

Now *this* method. Works. I just took TP squares, put three carrots per square across, three carrots down, nine carrots total. Then I took another square and covered it. This maximized the TP usage. I cut the TP squares into three strips, three carrot seeds per strip. I can then plant the strips, with the carrots about 1.5 inches apart and then do rows about four inches apart. (If you practice SQ FT gardening and really amend your soil well, this should be plenty of room for intensive growing.) If you don't practice SQ FT gardening, you can always just plant your rows 12 inches apart.


Friday, March 8, 2013

Weekend Projects: Composting

Our weekend project this week is Composting. Now there are two different types of compost. You can buy it, or you can make it. I of course, prefer the homemade variety, for a few reasons. One, you're getting your compost from several sources. What you put into your compost, will determine what sort of nutrients and minerals it is composed of. We throw kitchen scraps, grass clippings, newspaper, old twigs and dry leaves and even my daily coffee grounds complete with the unbleached filters.

If you buy your compost, you'll need to visit your local home improvement store and while it's decent compost, it's likely to come from just one source like chicken, rabbit or horse manure.

Another benefit of making it at home is that you have it ready all the time. You get to control what goes into it, therefore if you only eat organic produce, and you don't use chemicals or pesticides on your lawn, you can guarantee it will be organic compost. It's also so easy that even if you only have half a green thumb, you can compost.

The first item on the list is to find a spot to compost. I have ours near our garden, behind a shed. Sometimes, I'd like to have ti closer to the door, because I'm lazy, but most days I'm in the garden anyway, I just truck out the compost daily, in the morning.

Next, you need to decide if you want to keep your compost in a container, or in just a pile in the yard. Ours is in a pile. There's nothing surrounding it, other than the fence on one side, and the shed on the other. If you choose a container, there are many fancy ones out there, but really, some 2x4's are all you really need to simply build out a square and toss the scraps in the middle.

Next start turning your trash into brown gold. You can toss in food scraps (plant waste only, no animal waste  like meat and dairy), coffee grounds, plain office paper, newspaper, cardboard animal manure (no cat, dog or human waste), I even toss in my daily tea bags. When you put in paper, remember, no magazine papers (the thick glossy kind) and nothing with colored inks. Only black ink. We take our scraps out daily, because there are six of us and we collect a lot of scraps. However, for a smaller family you can take out a couple times as week, or you can even freeze your scraps in the freezer so they don't get yucky, then when your bucket fills, dump it.

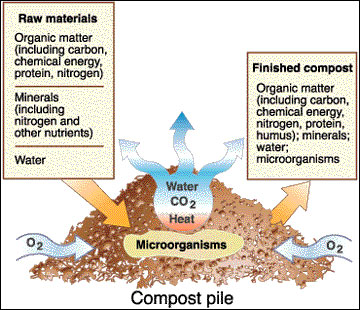
You can also turn the compost pile to speed up the composting process. To compost you need your scraps, water and air. Left long enough, a pile will compost on it's own with minimal watering. However, if you choose to go with a container, this is where having one becomes beneficial. You'll have to add in your water, but you can turn containers with some ease. There are special composting containers that have handles that you just crank it and the barrel turns. Or you can use a trash can with locking lids and just roll them around every once in a while. But, either way, if you turn the compost you'll get faster profits.

So this weekend, find a spot, and start composting! Your garden and taste buds will thank you :)


Sunday, August 7, 2011

Salsa!


118_3936For those of  you with gardens, you know what it means when August arrives. Tons of tomatoes and peppers. What to do with all those tomatoes and peppers? Why, salsa, of course!

Salsa is my most favorite condiment. It packs some serious flavor, with tons of nutritional content. I eat it on eggs, enchiladas, baked potatoes, in my rice, omelets, salads, chicken, the list just goes on and on!


What you need:
  • Tomatoes – whole and peeled
  • Tomatoes – diced
  • Onions – Vidalia or other sweet onion
  • Peppers – green, red, banana, mucho nacho, jalapeno, cayenne, the choice is yours!
  • Fresh cilantro
  • Limes (for juice)
  • Garlic – fresh (I was out of fresh and used powder, it’s still really good!)

What you do:

The first thing you  need to do is peel your tomatoes. Now, this is easy with the right approach. Put on a pot to boil, dunk  your tomatoes in there for about 30-40 seconds, and then immediately immerse in ice water. Let them sit in the water for about 1-2 minutes, and when you pull them out, the peels will slide right off. Just so you know, this works great for peaches, nectarines, and plums too.
118_3938

After you have your peeled tomatoes, dice the rest. I used early girl for my peels and then diced a ton of cherry tomatoes, because they were really coming in and we just couldn't keep up with eating them. You can choose what tomatoes you use. You can even used canned tomatoes from the grocery if you like.

Now, chop your onion and put it in your food processor. Add in the peppers and garlic. Blend up just a bit. Add in your tomatoes, both the whole and diced, your cilantro and lime juice. Give it a whirl around for about a minute and viola! You have salsa. Wasn't that easy?

If you prefer the taste and texture of store bought, with the "tomato puree" feel and look to it, you can add in a can or two of tomato paste, which will thicken and give it that store bought feel.

If you wanted to, after you were done with this, you could put it on the stove to cook for a bit, add in a cup of lemon juice and hot pack your salsa into half pint or pint jars. All you need to can it is a water bath, as it's on the cusp of the acidic foods spectrum. It only takes 15 minutes (20 minutes for altitudes 1000ft to 6000ft) in a water bath canner and you'll have canned salsa all year round! If you don't want to can it, you can keep it in a jar in your fridge for about a month or six weeks.

Saturday, August 6, 2011

Reusable Market Tote - Ultra Compact

118_3925Did you know, that the average American uses over 1200 plastic bags a year? 1200?? That's crazy! And then they all get tossed in the garbage. And don't fret, I was guilty for a long time too. I never even thought twice about it honestly.


Between grocery trips, convenience store outings, and that stop to get just one item, that they then stick in a bag for you....the waste accumulates, and accumulates! Some of you, probably use those bags to line your small trash cans, or for your litter boxes, etc. I myself used to line the bathroom and bedroom trash barrels with them.

118_3929

However, on my journey to be more environmentally friendly, I've stopped using plastic bags at all. We do have kitchen bags that are labeled as "biodegradable" and since we compost and recycle, we don't have much in the way of waste. I have various reusable bags that I've either made, or have gotten free from places, or have bought for $1 here and there that I use for my groceries. I also have found other uses for them from toting kids stuff around to toting books, storing my craft supplies, etc.

So, I decided what better way than to get people using reusable bags but take all the negatives away? The bags you can buy at the checkouts of your local grocery store are flimsy, and will rip easily. The handles break and they're boxy and don't fold down very small though they do fold flat. Regular totes are strong, but heavy, bulky and cumbersome to try to take several to do your shopping.

118_3930


So I found some 100% cotton, which by the way, you can compost when you've worn out your bags with shopping, and made a bag. It's based on the shape and funciton of plastic bags in that it has gussets on either side. There are no seams showing, as I've used French seams all around. Best part? Simply fold down the handles, fold either side in and then fold the top down and tuck it in the pocket located on the front. It goes from being  16W x 13H shopping bag to a quarter inch thick 7"x5" pocketed bag. You could take 10 or more with you in one open bag and do all your shopping! As you can see, I fit 2 boxes of baby cereal, a 5lb bag of sugar, a box of pasta, 2 cans of beans and a tub of cocoa in one bag.  And the best part? They're super cute!

118_3927

Monday, July 18, 2011

Homemade Yogurt


This is our original tutorial on making yogurt, but we've bettered it! I've found that the kids love orange, vanilla or other extracts in the yogurt with a small amount of honey. Honestly, it tastes just like Greek Gods yogurt IMHO, but is half the price.

Great thing about this yogurt is you can add in anything you want!


What you'll need:
  • Milk (the higher the fat content, the creamier it will be, I used 1%). Raw milk would make a great greek yogurt too!
  • Yogurt starter (I used Fage 2%), you'll need to get some without any additives, something organic if you can. You can also use freeze dried starters like Yogourmet.
  • Crockpot
  • Heating pad
  • Candy or meat thermometer
What you'll do: 

You start by heating the milk to 180º. Now this is important. You'll want to make sure you heat it up till it gets foamy on top. This will kill any bad germs right outta this milk. After this, either put the pan in in some ice water (be sure to not get water in your milk!) or you can just set it aside. When it reaches 110-115º, you're ready to go. I just filled my sink with ice water and set the pan in there, sort of like a double broiler, it took about 5 min to cool down.
000_0001
Next, you'll add in your starter. Now, how much milk you've used will determine how much starter you'll need. For every half gallon of milk, you'll need tbsp of starter yogurt. I used an entire gallon of milk and an entire carton of Fage 2%. Stir it up good now.
000_0003
Next, set your heating pad to Medium. Mine has four settings, warm, low, med and high. High was able to keep my yogurt at 112º for 8 hours. Also, if yours is like mine, you'll need to keep turning it on once every couple of hours, as it has an auto shut off. Also, make sure to put the heating pad on a cutting board and not on your counter, you don't want to ruin your counter! 000_0002

So, just shut the lid, cover with a towel and you're ready to go! Come back 8 hours later, and you'll have yogurt! Now, I went a step further. I tripled some cheesecloth, and put it in a colander, and then added the yogurt and let it drain overnight in the fridge. This drains the whey from your yogurt and takes it from being a runny thin yogurt to a creamy greek goodness. 8 hours in the fridge or so, was plenty. I also used the whey to water the tomatoes in my garden, which helps keep blossom end rot at bay.
.