Thursday, May 9, 2013

Grow a Revolution

Revolution comes in many forms. Revolution quite simply put means "a sudden and complete marked changed in something". Many times, revolution comes from a simple idea, taking root, developing and blossoming. In my quest for more self-sustaining knowledge (how ironic, I know), I come across many many "prepper" sites. Sites dedicated to guns, God and some growing of food. It's not really about taking what you have, and making something from it, more about Extreme Couponing 10 years worth of can goods and toilet paper, and shooting anyone that asks you for any.

Prepping shouldn't be about bunkers, stockpiles of ammo, and canned good. Prepping should be about preparing for the future.What's better? To have things? Or to know how to make those things? If I have knowledge of gardening, then when the zombies arrive, not only will I be able to survive on my stores from my garden that we preserve, but I will be able to grow more, and then preserve more. Not only will I be able to take care of my family, I'll know the best way to collect rainwater and make it drinkable. I will know that my sewing machine and some extra fabric lying around can make blankets for when it gets really cold.

There is more to survival than killing. This is what the revolution is about. But who are we revolting against you ask? Well, though it's not a revolution in the sense we're used to, as we're a bloody violent species, it's a revolution nonetheless. We are saying to Big Ag, and Big Corporations "NO!" We will not take it sitting down. We will not stand for it, while Big Ag turns our great land into a monoculture that's spreading like wildfire. We grow more soybeans, corn and wheat than anything else in the country, and most of it is GMO bullshit. We have two main types of cows we breed, one for food, one for dairy. Chicken farms are a disgrace to the name of farming. (If you dont know what a chicken or beef/dairy farm look like for real, go watch some free documentaries on Netflix, I'll give links below) We give them hormones, antibiotics and stick them in horrid conditions not fit for any living thing, and then consume those "products", all while being told its safe.

This is the kicker. That we listen when they speak. Why? Because it stands to reason, that they're the big whigs right? They know more than we do, right? Well, usually I would agree. However, in this case, they've destroyed the way we eat, the way we grow food and the way we slaughter food. We no longer eat real food, we're told to eat "food products" that might have 40% or less of actual food in the ingredients list. Why you ask? All in the name of a flipping dollar. To make more money.

So what do we do about it? Well that's where the revolution comes in. If no one is buying the products, then the businesses will fail. And who will be selling foods? Your local farmers. You neighbors. Perhaps even you. You would be amazed what you could do if you turned your lawn into a garden. I don't mean a measly little 10x10 plot with some tomatoes. I mean a diverse ecosystem filled with fruits, veggies, legumes, and all grown with your own two hands. Just think, if everyone that could, grew food, how many people wouldn't go hungry? How many more would learn the long lost art of farming?

So what do you do to keep the revolution going? 


  • Plant your land. If you live in the burbs like most of us, plant every square inch of space. We live on a corner lot and cannot obstruct traffic, so we haven't planted there yet, but every year we expand our garden, and I will keep expanding until we have no lawn left. Use cold frame and greenhouses, or even mini-greenhouses to extend the growing season well into the winter, and get a head start on summer. People further south could even grow tomatoes  year round in a cheap greenhouse. Compost your kitchen scraps, and if you have farm animals, their bedding makes for good compost too. Use it in your gardens so nothing has to lay fallow. 
  • For the urbanites, look to your windows and balconies to help you grow food. Hanging baskets, container gardening on a balcony/porch or even window boxes are all great options and with the right soil you can grow just about anything. 
  • For those in the country with some land, by all means, set your acres to wheat if you like :) The country folk are the ones I encourage to plant everything they can and then take what they have to the market for sale. 
  • For what you cannot grow yourself (like I do not have the room yet to grow winter wheat like I would like to), buy locally if you can find it. The more you ask for it locally, the more people will plant and the more you can buy. It's a nice cycle that begins with you. 
  • Save your seeds. This part is important. By growing heirloom varieties  you will be able to not only save your seeds for following years, but we will keep varieties going that would otherwise die off. 
  • Garden organically  This helps on many levels. Number one, the food is better for you. Number two you don't have to worry about ruining the land for future use. Number three, it's completely sustainable. If you till your garden by hand, then use your own homemade compost to amend the soil, plant companion crops along with pollinator attracting plants and practice crop rotation, then you will be on your way, well on your way to food sustainability. 
  • Raise some chickens. Or rabbits. Or a goat. Or hell, all three. Rabbits provide meat and manure  and if you get angora, you can even spin your own yarn from the fur. Goats will provide milk and manure. and chickens can provide meat, eggs, manure. Having these things in your farm can help complete the ecosystem thats needed for sustainability. If you have a good amount of land, I would suggest getting a rooster too, and selling some of your chicks to local suburbanites that would love the meat and egg portion of having chickens. 
  • Know your laws. Here's the thing. When you outright, knowingly break the laws regarding say, zoning in your town, you're not going to get anyway, and you're likely to make it worse for everyone else. Your town won't allow chickens in backyards? WORK to change it. Don't just get chickens anyway. Go to town meetings, get petitions signed, get it on the voting ballot for town meetings. Do everything you can, and when laws say you can't, work to change those laws. 
  • Last but not least, learn  how to dehydrate, preserve and can your foods. I really like freezing my foods, but I know that should there be a reason to not have the freezer space (either lack of actual freezer space, or lack of electricity to run that freezer, or even lack of money to run the electricity to run the freezer), then canning and dehydrating are going to be primary. If you can dehydrate, root cellar and can your foods, they can last all year through the winter. Don't forget, you dont have to can just your own foods. Every September I drive 60 miles to a great apple orchard and buy dozens of bags each weighing at least 8lbs, of apples. I then make apple butter, apple sauce and canned apples. You ca really widen your eating patterns if you can preserve not only food you grow, but food you find locally.

Every time I look around, I see more and more documentaries about Big Ag, or Big Corporations, or Big Pharm and what they're doing to our  health. I refuse to let me and my family fall prey to these companies that are only out to make a few bucks, even if it kills species of plants and animals and makes us humans sick and dying as well. We will not tolerate this. We will stand up to this. We will say NO!  We will learn the old ways, and teach them to others. We will plants seeds of both foods and knowledge that will fuel the revolution of change.


All of the following films are available on Netflix instant streaming: 


Wednesday, May 1, 2013

Growing your own Strawberries

One of my favorite Beatles songs is Strawberry Fields. It brings to mind vast acres of strawberries, bursting with juicy ripe red fruits just waiting to be picked and eaten. Then there's the strawberry shortcakes, the strawberry jams and the strawberries we can and freeze for later use as well. When I was younger, my mother would take us to a pick your own place in town and we'd spend a couple of hours there picking our strawberries, looking for the biggest and reddest ones. We'd leave a short time later with red stained hands and mouths, and quarts and quarts of strawberries. I'm not sure how big that field was, but as a child, it seemed to stretch on forever, and the strawberries seemed never ending.

I would absolutely love to have acres of strawberry plants. I would love, in the middle of town to have a pick -your-own where kids and their parents could visit and leave with yummy ripe organic strawberries that I've grown, but alas, I don't have that option, at least not until Hubby lets me dig up the entire side yard. For now,I have to settle for the 50 strawberry plants that I purchased from a nursery.

There are two types of strawberries. Everbearing (like Fort Laramies and Ozark Beauties) and then Junebearers (like Chandler and Honeoye). The difference between the two is simple. The everbearing start producing fruit on 10 hours of light a day and the Junebearers produce fruit only when there is 14+ hours of sunlight a day. With everbearing, you'll get a slow steady crop of fruit, and with Junebearers you'll get a large harvest all at once. I chose the everbearing for two reasons. Number one, I have four kids. Finding time to harvest and then process all those strawberries within a couple of weeks during the summer is going to be tough. With everbearing I can pick as they come ripe, and what we don't eat can be jammed and canned a couple of jars at a time. Secondly, my children, save the oldest, absolutely love strawberries and the idea of having strawberries in their own yard all summer long has them more excited than I've seen in a  long time.

Strawberries will come as dormant roots from the nursery, if you order online, or you can pick up some plants at your local nursery that you'll need to plant quite soon unless you have a green house or a growlight set up in your house or another place that doesn't get too cold. I ordered dormant plants because our weather has been insane lately (its May 1, and it's snowing and 32ยบ. REALLY). And because I could get a bundle of 25 a bit cheaper than in my local nursery.

If you do order online, you'll want to make sure to keep the roots in a place that doesn't get too warm, but that doesn't get too cold either. A garage ( that doesn't get below freezing) or a basement are two great places.

When you bring the roots out to plant, you'll need to prepare the soil accordingly. Having a slightly acidic  pH is essential (about 6.0 - 6.2) and make sure the site is free of weed and that veggies and fruits like eggplant tomatoes and peppers and the like or raspberries have grown before. These veggies/fruits could have contaminated the soil with verticillium wilt. The Hill System is the most common system used for everbearing plants and is what we will be using in our garden. You'll start with a hill of soil about 8 inches high off the ground and about 24 inches across. We have our hills to be about 20-25 feet long in our garden. You can set two rows of plants per hill and have each plant about 12 inches from other plants. Rows are around 4 ft apart usually but we practice intense gardening therefore, we will have a 2 ft walkway between each row. You'll also need to make sure you pay attention to your weather pattern, as you don't want freezing weather with your roots, but you want your plants well established in the garden before it gets too hot.


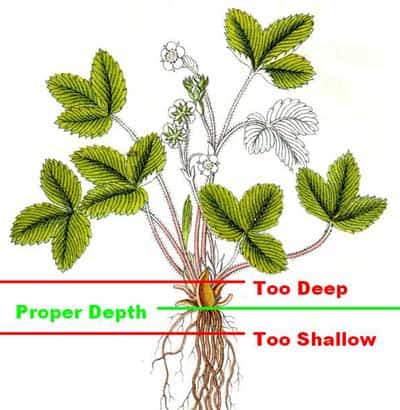
Using the picture above as a guide, you can simply place your roots in the ground making sure to create a small hill of soil in the hole you dig for the roots to spread out on. Fill the hole with dirt ensuring proper root placement and then press firmly on the soil and water thoroughly.

Now, strawberry plants will produce runners just like blackberries and the like. You can train the runners where you like or let them have free reign, but no more than 5 plants per square foot is essential for the healthiest plants. With everbearing plants, you should remove all runners and blossoms until July 1 to ensure healthy plants.

The great thing about strawberries? You plant once and enjoy them year after year. However, this means when winter comes, you'll need to ensure proper care of the plants so they don't die. In colder climates, you'll need to wait until the plants go dormant, which is usually around December when the temps drop into the teens or twenties and then mulch the plants with 2-3 inches of organic material like straw (not hay!) or pine needles. When spring comes, you simply need to make sure you cover the plants if a frost or freeze is expected. That second spring you should have great yields, which I hope you will enjoy!

Saturday, April 6, 2013

Weekend Projects: Seed Tape


As I browse the few catalogues I buy from each Spring, I am always looking to see what seeds come in a tape and can I use them. Lets face it. I love to garden. I love to do stuff from scratch. But I've got four kids and sometimes (read most) I'm lazy. I like the easy way out. I like to have a shortcut.


I always go back to buying the seeds by the ounce, because it's cheaper and we all know, we like our gardens to be as cheap as possible. I mean, if a packet of carrots cost me $2 and has 1500 seeds, thats less than $.0001 per carrot.  You can't beat that with a stick.  So then I had the bright idea, why not make my own seed tape?

Carrot seeds, radishes, lettuces. They are so tiny, and even those seed dispensers can be a pain to use when the seeds you're using are the same color or close to the same color as the dirt. And I hate thinning. It makes me sad to uproot little veggies that haven't had time to grow. I feel like I'm killing something. Plus, thinning takes work, and it's wasteful.

So I sat down and consulted the ultimate authority. Google. I found 100's of sites telling me how to make seed tape. Some said newspaper. Some paper towels. Some said elmers glue, some said a homemade paste of either cornstarch or flour and water. Well, I didn't have paper towels we got rid of those years ago. I don't get a newspaper to the house either. But I did have toilet tissue, and it's thinner than either newspaper or paper towels meaning it would break down faster allowing the germinated seed to grow better.

So I sat down with a roll of TP, some scissors a glue stick and my packet of 1500 Scarlet Nantes Carrot seeds. I tried the cornstarch and water/ flour and water paste. Let me tell you, if you have a glue stick, go with it. The cornstarch method was great if you made it thick (1:1), but it dried very very quick, and very thick. The thinner it was, the more mess it made. Lets face it, with four kids, I just don't need more mess, I have enough. So after wiping down my entire dining room table, I scoured the house and found a non-toxic glue stick. But the glue stick was too thick and was ripping the paper. For the love of Pete I just wanted some seed tape. So I consulted the second best authority. My best friend. I hope on the net and shoot her a message. She responds. "Use a toothpick to get some glue, and pick up the seed and then smoosh it on the toilet paper". GENIUS.

Now *this* method. Works. I just took TP squares, put three carrots per square across, three carrots down, nine carrots total. Then I took another square and covered it. This maximized the TP usage. I cut the TP squares into three strips, three carrot seeds per strip. I can then plant the strips, with the carrots about 1.5 inches apart and then do rows about four inches apart. (If you practice SQ FT gardening and really amend your soil well, this should be plenty of room for intensive growing.) If you don't practice SQ FT gardening, you can always just plant your rows 12 inches apart.


Friday, March 8, 2013

Weekend Projects: Composting

Our weekend project this week is Composting. Now there are two different types of compost. You can buy it, or you can make it. I of course, prefer the homemade variety, for a few reasons. One, you're getting your compost from several sources. What you put into your compost, will determine what sort of nutrients and minerals it is composed of. We throw kitchen scraps, grass clippings, newspaper, old twigs and dry leaves and even my daily coffee grounds complete with the unbleached filters.

If you buy your compost, you'll need to visit your local home improvement store and while it's decent compost, it's likely to come from just one source like chicken, rabbit or horse manure.

Another benefit of making it at home is that you have it ready all the time. You get to control what goes into it, therefore if you only eat organic produce, and you don't use chemicals or pesticides on your lawn, you can guarantee it will be organic compost. It's also so easy that even if you only have half a green thumb, you can compost.

The first item on the list is to find a spot to compost. I have ours near our garden, behind a shed. Sometimes, I'd like to have ti closer to the door, because I'm lazy, but most days I'm in the garden anyway, I just truck out the compost daily, in the morning.

Next, you need to decide if you want to keep your compost in a container, or in just a pile in the yard. Ours is in a pile. There's nothing surrounding it, other than the fence on one side, and the shed on the other. If you choose a container, there are many fancy ones out there, but really, some 2x4's are all you really need to simply build out a square and toss the scraps in the middle.

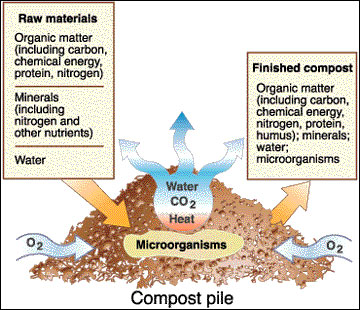
Next start turning your trash into brown gold. You can toss in food scraps (plant waste only, no animal waste  like meat and dairy), coffee grounds, plain office paper, newspaper, cardboard animal manure (no cat, dog or human waste), I even toss in my daily tea bags. When you put in paper, remember, no magazine papers (the thick glossy kind) and nothing with colored inks. Only black ink. We take our scraps out daily, because there are six of us and we collect a lot of scraps. However, for a smaller family you can take out a couple times as week, or you can even freeze your scraps in the freezer so they don't get yucky, then when your bucket fills, dump it.

You can also turn the compost pile to speed up the composting process. To compost you need your scraps, water and air. Left long enough, a pile will compost on it's own with minimal watering. However, if you choose to go with a container, this is where having one becomes beneficial. You'll have to add in your water, but you can turn containers with some ease. There are special composting containers that have handles that you just crank it and the barrel turns. Or you can use a trash can with locking lids and just roll them around every once in a while. But, either way, if you turn the compost you'll get faster profits.

So this weekend, find a spot, and start composting! Your garden and taste buds will thank you :)