Saturday, April 6, 2013

Weekend Projects: Seed Tape


As I browse the few catalogues I buy from each Spring, I am always looking to see what seeds come in a tape and can I use them. Lets face it. I love to garden. I love to do stuff from scratch. But I've got four kids and sometimes (read most) I'm lazy. I like the easy way out. I like to have a shortcut.


I always go back to buying the seeds by the ounce, because it's cheaper and we all know, we like our gardens to be as cheap as possible. I mean, if a packet of carrots cost me $2 and has 1500 seeds, thats less than $.0001 per carrot.  You can't beat that with a stick.  So then I had the bright idea, why not make my own seed tape?

Carrot seeds, radishes, lettuces. They are so tiny, and even those seed dispensers can be a pain to use when the seeds you're using are the same color or close to the same color as the dirt. And I hate thinning. It makes me sad to uproot little veggies that haven't had time to grow. I feel like I'm killing something. Plus, thinning takes work, and it's wasteful.

So I sat down and consulted the ultimate authority. Google. I found 100's of sites telling me how to make seed tape. Some said newspaper. Some paper towels. Some said elmers glue, some said a homemade paste of either cornstarch or flour and water. Well, I didn't have paper towels we got rid of those years ago. I don't get a newspaper to the house either. But I did have toilet tissue, and it's thinner than either newspaper or paper towels meaning it would break down faster allowing the germinated seed to grow better.

So I sat down with a roll of TP, some scissors a glue stick and my packet of 1500 Scarlet Nantes Carrot seeds. I tried the cornstarch and water/ flour and water paste. Let me tell you, if you have a glue stick, go with it. The cornstarch method was great if you made it thick (1:1), but it dried very very quick, and very thick. The thinner it was, the more mess it made. Lets face it, with four kids, I just don't need more mess, I have enough. So after wiping down my entire dining room table, I scoured the house and found a non-toxic glue stick. But the glue stick was too thick and was ripping the paper. For the love of Pete I just wanted some seed tape. So I consulted the second best authority. My best friend. I hope on the net and shoot her a message. She responds. "Use a toothpick to get some glue, and pick up the seed and then smoosh it on the toilet paper". GENIUS.

Now *this* method. Works. I just took TP squares, put three carrots per square across, three carrots down, nine carrots total. Then I took another square and covered it. This maximized the TP usage. I cut the TP squares into three strips, three carrot seeds per strip. I can then plant the strips, with the carrots about 1.5 inches apart and then do rows about four inches apart. (If you practice SQ FT gardening and really amend your soil well, this should be plenty of room for intensive growing.) If you don't practice SQ FT gardening, you can always just plant your rows 12 inches apart.


Friday, March 8, 2013

Weekend Projects: Composting

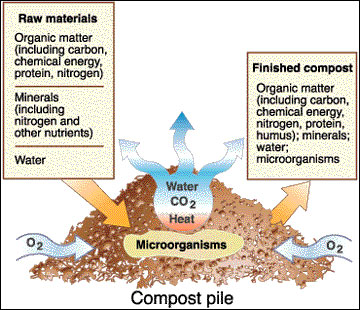
Our weekend project this week is Composting. Now there are two different types of compost. You can buy it, or you can make it. I of course, prefer the homemade variety, for a few reasons. One, you're getting your compost from several sources. What you put into your compost, will determine what sort of nutrients and minerals it is composed of. We throw kitchen scraps, grass clippings, newspaper, old twigs and dry leaves and even my daily coffee grounds complete with the unbleached filters.

If you buy your compost, you'll need to visit your local home improvement store and while it's decent compost, it's likely to come from just one source like chicken, rabbit or horse manure.

Another benefit of making it at home is that you have it ready all the time. You get to control what goes into it, therefore if you only eat organic produce, and you don't use chemicals or pesticides on your lawn, you can guarantee it will be organic compost. It's also so easy that even if you only have half a green thumb, you can compost.

The first item on the list is to find a spot to compost. I have ours near our garden, behind a shed. Sometimes, I'd like to have ti closer to the door, because I'm lazy, but most days I'm in the garden anyway, I just truck out the compost daily, in the morning.

Next, you need to decide if you want to keep your compost in a container, or in just a pile in the yard. Ours is in a pile. There's nothing surrounding it, other than the fence on one side, and the shed on the other. If you choose a container, there are many fancy ones out there, but really, some 2x4's are all you really need to simply build out a square and toss the scraps in the middle.

Next start turning your trash into brown gold. You can toss in food scraps (plant waste only, no animal waste  like meat and dairy), coffee grounds, plain office paper, newspaper, cardboard animal manure (no cat, dog or human waste), I even toss in my daily tea bags. When you put in paper, remember, no magazine papers (the thick glossy kind) and nothing with colored inks. Only black ink. We take our scraps out daily, because there are six of us and we collect a lot of scraps. However, for a smaller family you can take out a couple times as week, or you can even freeze your scraps in the freezer so they don't get yucky, then when your bucket fills, dump it.

You can also turn the compost pile to speed up the composting process. To compost you need your scraps, water and air. Left long enough, a pile will compost on it's own with minimal watering. However, if you choose to go with a container, this is where having one becomes beneficial. You'll have to add in your water, but you can turn containers with some ease. There are special composting containers that have handles that you just crank it and the barrel turns. Or you can use a trash can with locking lids and just roll them around every once in a while. But, either way, if you turn the compost you'll get faster profits.

So this weekend, find a spot, and start composting! Your garden and taste buds will thank you :)


Tuesday, December 4, 2012

Chicken Stock

Have you ever wondered what makes soups so delicious? Well, it's all in the broth baby

And that broth is comprised mainly of chicken stock. (Or vegetable or beef stock).

So what is chicken stock exactly? Chicken stock is a great way to make use of the whole chicken. When you go to the grocery and get bone in chicken or a whole chicken, don't toss the remaining portions once you've removed the meat! Instead, use up every little bit you can, and make stock for soups and stews.


You start with the ingredients for a good stock:


  • Chicken leftovers (bones, fat, etc)
  • 1 coarsely chopped carrot
  • 1 rib of celery
  • 1 coarsely chopped onion
  • 1 bay leaf
  • Fresh thyme
  • Fresh parsley
  • Salt to taste (I do not salt my stock. I in turn, salt the soup when making it).
 

The rest? Simple. You put it all in the crock pot, add water till its about an inch from the top and set your timer for 10 hours on low. The great part? It can be done overnight or all day long.

When it's done simply run it through a sieve, and freeze the stock. I use plastic freezer jars that hold 16 ounces of liquid. This way, I simply grab a couple when I'm making soup, and the rest stays frozen until next time. I am able to get about 10 pints of stock. That's several batches of homemade soup! And the best part is you can then preserve your soups by canning them if you wish.


Tuesday, February 21, 2012

Day 35 Bento Days: Egg Salad with Pita Chips

1329831766532Sorry you guys for the small picture! I normally use my macro setting on my camera and take close ups, but couldn’t find the camera this morning and we were running late. Well, the kids weren’t too keen on the egg salad today. My son doesn’t like mayo, and my daughter doesn’t like mustard. And egg salad has both. But! They actually tried it this time, so we’re making progress!
Most of the cook time on today menu is for the boiling of the eggs. You know, they have to boil for 10 min, and then sit for another 10 turned off, but still in the hot water. So that’s where that comes from. While you’re boiling the eggs, throw some brown sugar in a pot with apple slices and let them stew over low heat for about 10 minutes. I used a veggie cutter to cut the cheese into long flower shapes and then just used a small knife to make them small coin like shapes.
The pita chips, you simply take a pita pocket, cut it into 8ths, and toast under your broiler for a few minutes until it’s crispy and warm.
 Today's Menu:
  • Egg salad
  • cheese flowers
  • pita chips
  • stewed apples
 Cost per lunch:  67¢

Prep Time Cook Time Ready In
4 min 20 min 24 min


Servings Calories Fat Carbs Protein
1 377 13 55 14